Friday, January 27, 2017

I can't believe it's already 2017!

    
     I'm revamping my blog and bringing it back to life! While I've been gone from the blog I've been trying out different mediums and mixing them to see how they work together. It's been pretty fun! This year as I explore different techniques, mediums and resources I hope to post what I learn so that it may be useful to someone else as well. 

     This year I've set a goal to complete my first children's book! Be sure and check back! I will be sharing the steps I'm taking, awesome things I get done and even the mistakes I make. Hope you enjoy this year with me!  


Here are some oil pastel projects I did while I was away from my blog.


Cherry on a paper bag.

Orange on a paper bag.


     I got my oil pastels as a gift from my parents. I wanted to try them out but I didn't have any of my papers with me. I grabbed a paper bag to try them out on. This is what I got! I was pretty happy with the effect of oil pastel on a brown paper bag.


Butterfly on watercolor paper.


     This butterfly I did on watercolor paper. I didn't care as much for the texture of the paper when working with oil pastels. It left a lot of white spots on the page unless I tried really hard to work the pastel into the paper. I especially didn't like working on the background. Maybe as I work with it a little more I could find a better technique for using them with watercolor paper. 


Driving on blue card stock paper. 


     After the butterfly I decided to get a paper that would already have most of the background color there. So I did this little driving scene on blue card stock paper. It is one of my favorites with pastel so far. I love the cloud that is a little darker in this picture. I feel like the pastels blended really well and then smudged just right for a bit of rain. 

Thursday, May 14, 2015

Froggy-O and Ribbiette


I'm back! After pregnancy and newborn time I found a moment to bring out the paints again :) I sketched out a frog and thought of him singing a song to his love. As I sketched it, it began to remind me of Romeo and Juliet with my little frog gal sitting up on her balcony of a log.

Sketching on regular paper I can erase and draw all I want. Then I use a dark marker to outline only what I actually want to be in my picture. After that I trace it onto my watercolor paper with pencil. I always feel a little funny taping it up to my window to trace, but it works great when it's daytime.


I used this painting to try out masking fluid, which I had never tried before. Surprisingly easy to use, clean up, and peal off of my picture.  I will be using it again! Something I read about after I was done with the picture was layering using masking fluid. Basically using it on painted areas to protect it while you paint around it. I think I will give that a try next time. On this picture I masked out the frogs, the plants, the moon and stars. I think I will try and find a better technique for putting the fluid on for the stars. I just splattered the masking fluid on. Next time I would want the stars a little bit more evenly spread and not so many that are really big.

After everything was dry and the masking fluid peeled off, I used a fine writing marker to do some outlining. I remembered seeing some illustrations that the illustrator only outlined the main characters in the pictures or the most important things. I think this is kind of a neat way to highlight or make your key pieces stand out. I took pictures along the way so I could compare. I'm undecided right now on which way I like more.

In the picture with partial outlining I do like how it makes the frogs stand out. But the picture where the log and plants are also outlined has more of a finished feel to it.


Friday, December 27, 2013

Kind of Cartoony Kid Portraits


Head Full of Curls
December 2013

Watercolor and Pencil on Watercolor Paper

This picture was fun to paint! It's of my son and his head full of curls! After many failed attempts at sketching a picture of a child, I decided I needed some help. I began reading! The best suggestions that I have found so far are to keep it simple, look at real children (or real pictures of them) while you are drawing/painting them, and that the type of clothing is really important in creating a child's image. I like detail so keeping it simple was kind of hard for me... but I think it worked! I used my own children that I could reference easily. I kept the clothes simple and casual. This was really fun to have this and my other portrait below turn out looking like a happy children that weren't strangely proportioned!

The thing that I didn't really care for was the uneven paint for the skin. I was trying to create highlights and shadows by layoring the paint, but I didn't blend it well enough. I did a yellow wash where the hair would go, and a slightly orange yellow to create the curls. I really like the shirt texture. There was a lot of water and pigment on the paper to move around and put it just where I wanted it. I feel like I'm getting a better feel for how to use the water to paint ratio to create different looks.  


Pretty Pink Princess
December 2013
Watercolor and Pencil on Watercolor Paper

This pretty girl is my second attempt at painting a child. It's of my little girl who is very attentive to what my pictures look like and says exactly what she thinks of them. So needless to say I was a little nervous what she would think of her painted picture. (I learn a lot from her comments because they are completely honest opinions and thoughts! If I want to learn to illustrate for children then the honest thoughts and opinions of a child are probably quite valuable!) Happily I report that she liked it and thought the hair was cute! Phew! 

Everywhere her hair was going to be, I put a wash of the same color I had used for her skin. Then I took a brown and went over the wash, leaving some strokes darker than others to create the hair texture. I also used a brush with just water to to lift pigment off the paper to make other areas lighter. I think the combination of techniques worked well. The darker color under her bangs looks like orange-ish hair instead of the intended shadow... I'll have to figure that one out.

Many thanks to my kids!


Wednesday, December 18, 2013

Pick of the Week: The Mitten


Features are well proportioned on Nikki and his grandmother. Her style is to create the animals realistically while giving them human like thoughts or actions and sometimes clothes too (but not in this one.) Its enchanting effect is very distinct. Another thing that I enjoyed about "The Mitten"  was that on both sides of the main illustration it has "mitten windows". The windows show the background story of what the Nikki is doing while the animals take over his mitten. There is a lot of detail to discover each time you look over her illustrations. 

Wednesday, December 11, 2013

Bird and the Beanstalk

Bird and the Beanstalk
December 2013

Watercolor on Watercolor Paper

What a surprise for a bird flying, to run into something so high up! This was the first time in a really long time of using actual watercolor paper. I found it in an old bin of my things and decided to give it a shot. Consider it a sold concept, using watercolor paper when I watercolor! I could actually work the paint in different ways after it was down. Some things I tried on this picture were layering the paint to create darker areas and moving the pigment around with water to create light areas. I took tissue and wiped off the paint in the blue background for the clouds. In the scan you can't see it, but it left a slight bluish wash with a few light blue streaks that I really liked because it added texture to the white area. I put a yellow wash over the beanstalk after I had the green where I wanted it. For the streaks behind the bird and the birds feathers I used a lifting technique with water and brush to pull the paint back off the paper in those places. Two things that I would change... or work on: The bird is a little heavy in the tail department. The background isn't a solid, smooth wash. I will need to practice to get the background all one shade and smooth. One funny thing was that when my daughter saw the picture, she knew it was Jack's beanstalk. She saw the bird and couldn't get over the fact that I gave it eyebrows! So funny!   

Saturday, December 7, 2013

Pick of the Week: Pancakes, Pancakes!


Tuesday, December 3, 2013

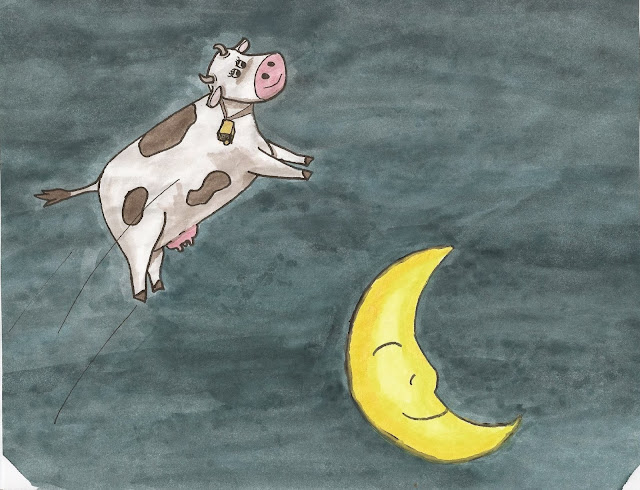
Cow Jumped Over the Moon

Cow Jumped Over the Moon
November 2013

Water Color, Black Archival Ink Pen on Sketch Paper

In this picture I wanted to try some shading by layering the paint. It kind of worked on the moon but not how I had hoped. I had to paint layers with a slightly darker color to get anywhere near the look I wanted. The shading on the cow I thought wans't too bad. The paint for the shading was the same as the dark spots on the cow, just with more water added. Later I realized a slight problem. The shaded part of the cow is facing the moon, or the light sorce (woops!). I practiced making some animals using basic shapes and then adding the detail. I looked through and practiced with drawing books for ideas. I think it really adds alot to the picture, and will make it easier to create characters by getting the baisic shapes down! The color of the sky is much better than in the Cat and the Fiddle picture, I added a little blue in.